Alvis Firebird No 26.
I have tried to keep true to the picture of the inspiration car, I’m particularly pleased with the bits of fakery used to get the look.
The Inspiration Car
My inspiration car is the Alvis Firebird. When I discovered CycleKarts GB the choice of the Firebird was an obvious one for me. Firstly, Alvis is a great car mark who introduced lots of engineering innovations, they were part of the Brooklands era and competed in the early British GP and La Mans races. Added to this my grandfather had a Firebird, it was a monstrous car which he would joke to me had an elephant hide roof, sadly the car left the family when he died in the early 70’s.
The Chassis
Having researched the Firebird and found some nice side and front elevation pictures of a sports special. Firstly I drew out corresponding full-scale plans overlayed over the ‘Stevenson’ CycleKart dimensions. The Alvis scales at around 60% full-size in CycleKart dimensions, but as many of you will have discovered you still need to accommodate a full size driver and the engine package so some interpretation is needed but my intention was to keep the proportions of the Alvis as best I could.
I had also found an Alvis chassis drawing; the Alvis has a distinctive crank at the front of the chassis which I decided to replicate – this has made the design more complicated and gave some challenges in cutting the parts but I felt important in achieving the look.
The Chassis is constructed from 75x25mm 1.5mm thick steel box section. I fabricated some soft tooling attached to 18mm ply sheet, I clamped the box sections to this for welding with a small gas-less MIG welder.
To ensure the structure was sufficiently ridged I added in some corner bracing.
The Body
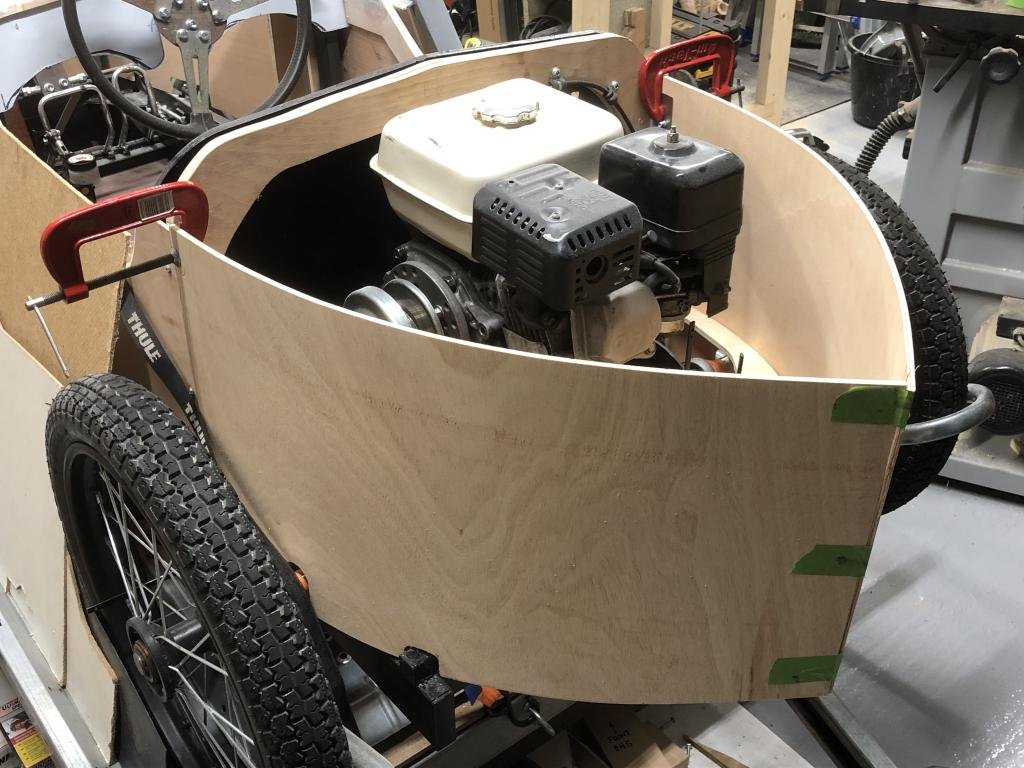
For the bodywork I have used principally plywood (including some flexi-ply) with some hard composite foam and fiberglass for some of the detailed areas. At this point I resorted to the full-scale drawings and lots of cardboard! Which intern became the templates for the ply.
The Firebird bodywork extends outside the chassis rails, this was another feature I wished to emulate as I felt this was a key feature. I decided I could best achieve the bodywork using coachbuilding principles! Having fabricated some frames for the ‘scuttle’ and rear bulkhead I completed a central ‘tub’. Next I made the radiator cover, this was formed from hard foam and skimmed with body filler.
Next was the bonnet and side panels to fill in between the tub and radiator, The sides are ply sheets with central heating louvers for the vents, and a cutdown milk bottle for the air intake. I made the bonnet on a frame of ribs and stringers – Coach building meets aircraft structures! The radiused sides I used some composite foam and a layer of glass fibre matting; the final shaping was using a radius template and some body filler.
The boat tail I made in flexi-ply over some frames. The boot lid was particularly tricky, originally, I was thinking of a wood finish, but I had to settle for what I could achieve. Each of the elements are removable for the chassis for access to key components.
Running Gear & Engine choice
Axles - As a first build I chose to use the Gemini karts front and rear axles, this had the advantage of having the geometry set including the ackerman steering dimensions. I did find I had to adjust the width of the chassis rails to get within the flat portion of the front axle. The rear axle is 25mm diameter mounted on bearings over the chassis rails – Although a solid axle it does have the advantage of 6mm keyways along the whole length of the shaft.
Springs – Stefan kindly supplied me with a drawing which Jones Springs in Birmingham manufactured a pair of springs to. To mount the springs to the chassis I fabricated some front hangers and rear swinging arms, I did find I needed to extend the rear hangers as the springs hit the chassis members on bumpy ground, I also added a bump stop as part of this modification, which has resolved the clashing when bottoming out.
Gearing – When initially building the CycleKart 15 tooth 219 drive cogs were not available so I turned a rotax cog to fit the torque converter, I have now replaced this with a 15 tooth drive cog, still driving a 96 tooth gear – 6.4 Ratio.
Braking – I had bought a donor go-kart that had a Kelgate braking system that I have transferred to the CycleKart. I did recondition the units with new seals, and all was connected up using the braded hose system from Car Builder Solutions. As a foot note buying a go-kart was both a blessing and a curse! I wasn’t able to utilise as many parts as I had hoped, luckily It wasn’t that expensive, and I got half the cost back selling the wheels!
Engine - As mentioned above I had a bought a donor kart, this had a Honda GX160 engine which I used for the first few events, it proved quite acceptable but I have now replaced this with a Hyundai 212cc engine with electric start. The increase in power has been noticeable and the electric start is very handy – I have added an hour logger to aid in knowing the service intervals.
How long did it take to build?
I first attended a CKGB builders meeting in Jan 2023 which was my kick start to collecting parts (and finding the donor kart) this took the next few months during which I also drew up the full-scale plans.
With most of the key parts and materials available I cut and welded the chassis, mounted the axles made the engine supports and steering components to have a drivable rolling chassis for the Westonzoyland event in July 2023. Most of the winter and spring was building the bodywork, painting and finishing ready for the 2024 season when I have been able to join in with fellow Cyclekart and different events.
What’s the least and most favourite part of the build?
I have enjoyed all the different aspects of the build to a greater or lesser extent. If I had to pick a least favorite part of the build it would be the painting, which felt like it went on forever, having a plywood base there were many coats of undercoat, but I’m pleased with the result – Craftsman paints were excellent. As for a favourite part of the build realising the design from the inspiration car, working out how to package everything together and seeing the build progress. Getting to Brooklands as been a highlight of my Cyclekart build.
The Little details
I have tried to keep true to the picture of the inspiration car, I’m particularly pleased with the bits of fakery used to get the look. Pizza trays for the brakes, push bike saddle bag for the toolbox, toy eagle for the bonnet mascot and drainpipe and heating insulation for the exhaust.seems to work incredibly well.
How does it drive?
First its great fun! I tried the CK out as a rolling chassis which was a handy shakedown, and identified a few small issues but generally confirmed that all was as expected. I have gone for a simple pitman arm steering, so things are pretty direct. Drive wise I have used mainly a single wheel drive with the other freewheeling, with this steering is easy. I have tried driving both wheels, but this does make the steering very heavy. (Im not running a differential)
Ongoing changes and tweaks
As others have said, are these things ever really finished! I have a list of to-dos that includes making a replacement for the current kart seat with a more period looking upholstered seat, I’m also looking at making some front lights, Alvis’s had a set of large diameter lights. I’m sure there will be more!
If you haven’t already joined the forum then please consider doing so and then you can see and read Ian’s Build Journal on the forum in full.


